Photoshop Tutorial Old Postmark Stamp
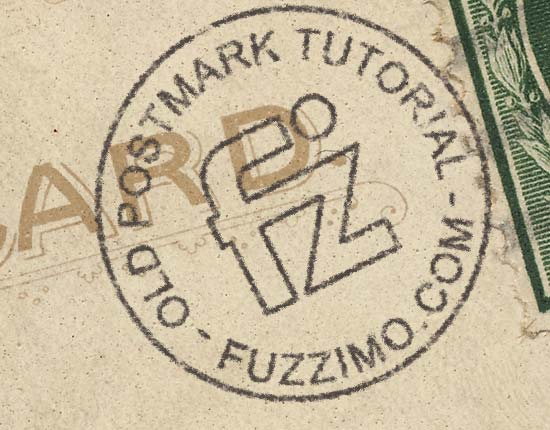
Hmm, I haven’t really done any Photoshop tutorials. Strange thing considering I use it very often : ). So here’s one on how to add a vintage custom made postmark to the old postcards and airmail envelopes from my previous posts. It’s a cool way of personalizing them.
To begin I’ll be using this envelope image as background for the postmark. You can download it by clicking on it. It’s best to work with the original size and then at the end scale it down for your project.
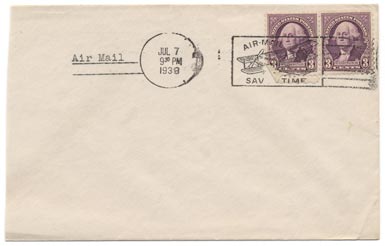
For this particular image you could just add the city name to the existing stamp mark and be finished, but in the tutorial I’ll cover doing the whole postmark.
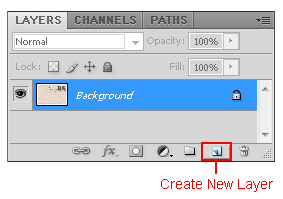
1. Open the envelope image in Photoshop and click on Create a New Layer in the Layers Window (if it’s not open, go to top menu Window > Layers).
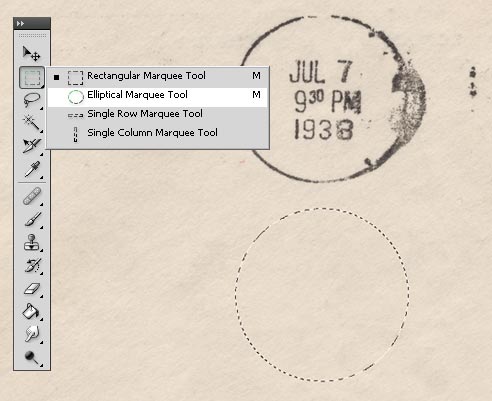
Grab the Elliptical Marquee Tool from the tools menu and drag out a circle similar in size to the original postmark on the envelope. Hold Shift to drag a circle and if you press spacebar at the same time you can also move the selection.
Give the selection a stroke – top menu Edit > Stroke and in the Stroke Options set Width: 10px, Color: black and Location: inside.
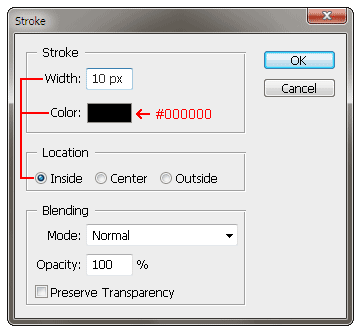
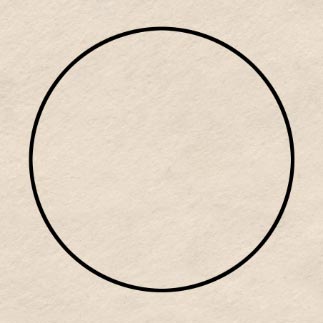
After clicking ok, press Ctrl+D to deselect the selection and you should be left with a circle just like below.
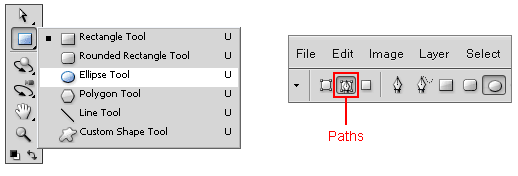
2. Now we’ll add the city name on a circular path. First get the Ellipse Tool from the tools menu and then in the upper left area right under the top menu there are 3 options – Shape Layers, Paths and Fill Pixels. Make sure you have Paths selected.
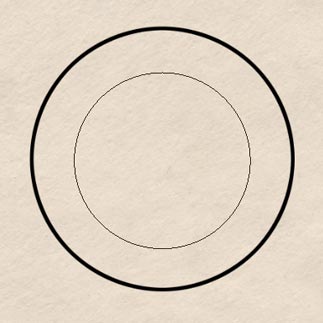
Drag a circular path and align it more or less to the inside of the black circle just like in the image below (as before, hold Shift to drag the circle and if you press spacebar at the same time you can also move the path around).
From the tools menu get the Horizontal Type Tool and in the Character Window select a font. I’ll use Arial Regular 24pt (Narrow also works well); choose black for the text color (if the Character Window it’s not open, go to top menu Window > Character).
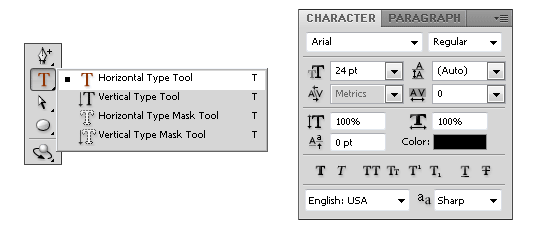
When you go over the path with the Horizontal Type Tool the cursor will slightly change.

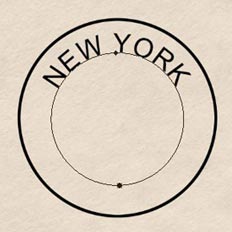
When it changes, click on the path line somewhere on the upper center. Now it should become a blinking cursor and you can type your city in capital letters. When you are done typing, click on a different tool to exit or click on Commit edits button (✓) in the top area.
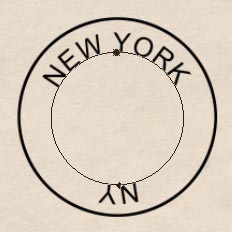
Now we’ll add a second text area for state or country to the bottom of the postmark. In the Layers Window right click on the current text layer > Duplicate Layer. With the new layer still selected go to top menu Edit > Transform Path > Rotate 180°.
Using the Horizontal Type Tool click somewhere on the upside down text to edit it and type the state or country.
There are two ways of flipping the upside down text to the inside of the path – one is to simply go to top menu Edit > Transform Path > Flip Horizontal – or another way is to grab the Path Selection Tool (A) and drag the text upwards until it moves to the inside of the path – (second way is also useful if you want to move the text along the path).
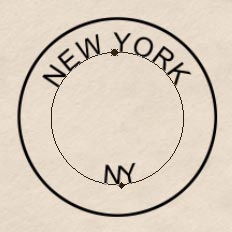
Now the bottom text doesn’t align with the upper one, so press Ctrl+T (or top menu Edit > Free Transform Path) and then hold down Shilt+Alt and drag one corner to scale up the path.
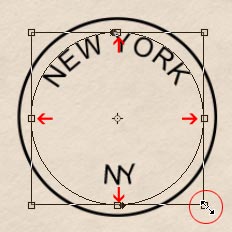
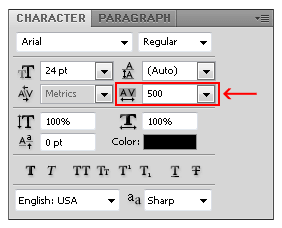
The bottom text looks a bit crammed so to separate the letters go to the Character Window and type 500 in the tracking box.
Type the day, the hour and year on separate text layers. Use the Move Tool (V) to move and align the layers. To make the minutes smaller select them with the Horizontal Type Tool and then in the Character Window click on Superscript.
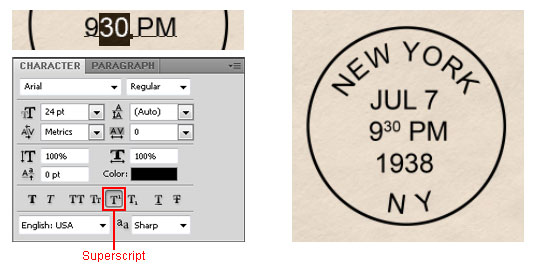
In the Layer Window select all layers except the background (hold Shift and click them) and then right click > Convert to Smart Object. Rename it to something more suitable like “postmark text” by double clicking on the name.
Note: to edit the content of a smart object double click on the layer thumbnail and it will open up in a separate window; after making changes save it and it will automatically be updated in your original window as well.
3. Create a new layer in the Layers Window.
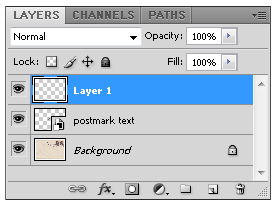
With the Rectangular Marquee Tool drag a selection that covers the whole postmark.
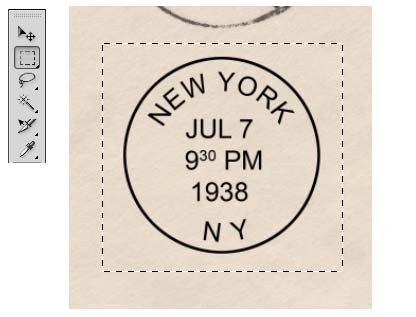
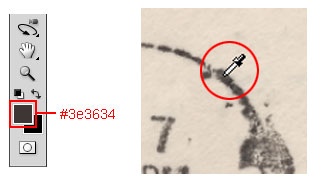
Click on the foreground color to open color picker window and either put the color #3e3634 or with the eyedropper get a dark shade from the original stamp on the envelope.
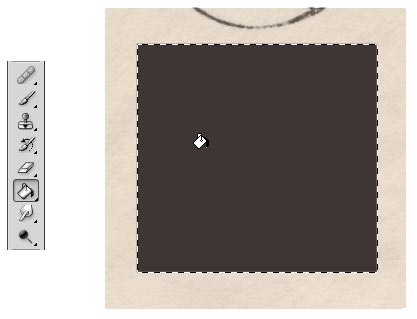
Fill the selection with the Paint Bucket Tool (or Alt+Delete shortcut) and press Ctrl+D to deselect.
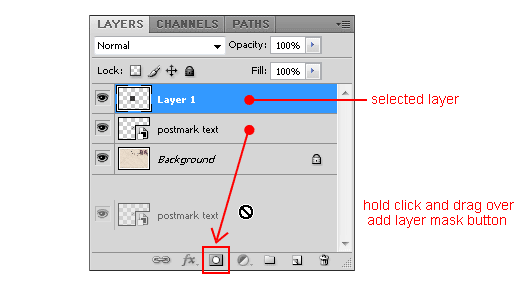
In the Layers Window make sure you have selected the layer you just filled. Now click and hold the mouse button on the “postmark text” layer and without letting go drag it over the Add Layer Mask button. Note: For this to work Layer 1 has to remain selected; remember to click and hold the mouse button as you drag “postmark text” layer.
Now you should see the text instead of the filled rectangle. Go ahead and hide the “postmark text” layer by clicking the eye icon and then click on the Layer Mask Thumbnail for Layer 1 to select it.
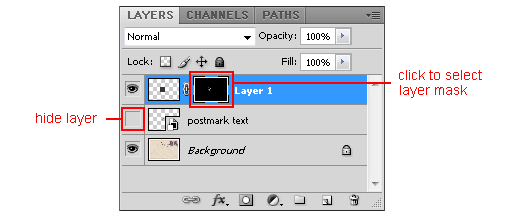
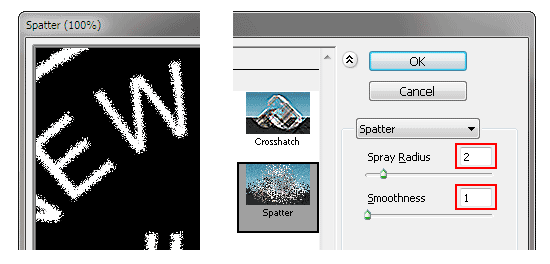
Go to top menu Filter > Brush Strokes > Spatter which will open up the options window. If the stamp is not visible in the preview window right click > Fit in View and to do a close up right click on the postmark > Actual Pixels. In the options put Spray Radius: 2, Smoothness: 1 and click OK.
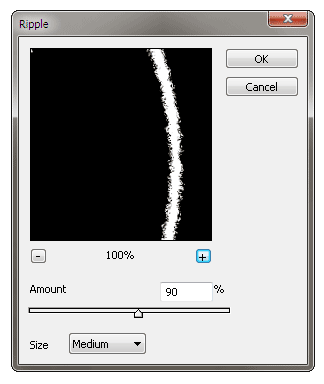
Go to top menu Filter > Distort > Ripple. In the options window you can put Amount: 90% and Size: Medium.
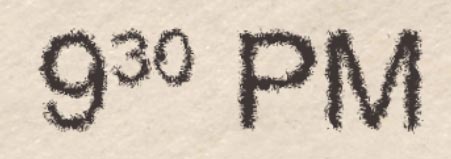
Now the text should look something like this:
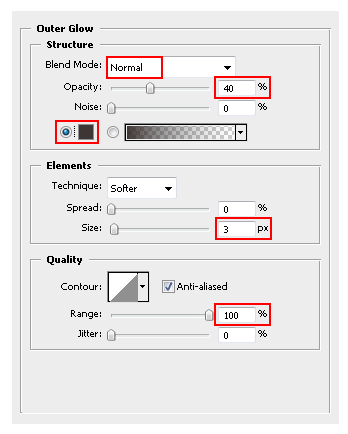
To get a smoother look go to top menu Layer > Layer Style > Outer Glow and set the options as in the image below. For the color use the same as the layer fill color (#3e3634).
4. Now we’ll give the postmark an older worn out look – With Layer 1 selected press Ctrl+G to add it to a Group. With the Group selected click on Add Layer Mask icon in the Layers Window and then click on that layer mask to select it.
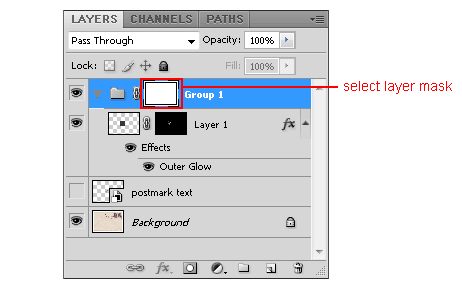
Now you will need a grunge brush. You can use your own – or if you don’t have any installed you can download this one here. (abr) (zip file 3.8mb)
• The simplest way is to double click the .abr file and the brush will show in your brushes palette. The downside of this is that once you reset your brushes you would have to go browse again to the .abr file instead of loading it directly from Photoshop.
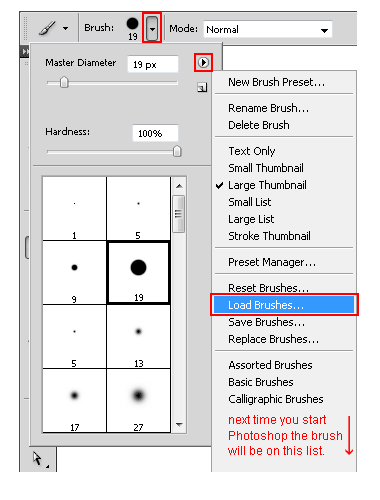
• The “proper” way to install a brush is to copy the .abr file to your Programs Photoshop\Presets\Brushes folder and then with the brush tool selected click on the arrow next to the brush options to open the brushes palette (or right click on the canvas). Now click on the small triangle in the upper right corner > Load Brushes. Browse to the Photoshop\Presets\Brushes folder and select it. Next time you’ll start Photoshop the new brush will be on the drop down list along with the others.
 Close
Close
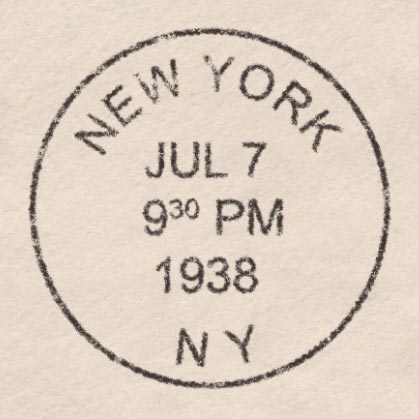
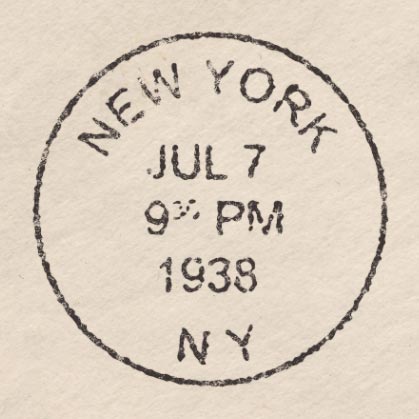
With the brush tool selected right click somewhere on the canvas to get the brush palette and select your grunge brush. Make sure you have the brush color set to black and that the Group-1 layer mask is still selected. Click once on top of the postmark and it should give it a nice worn out effect. If you want to fade it out more, click multiple times. Now you should have the finished postmark.
If you want, click to expand these two additional tutorials:
Heavier Ink Postmark It’s interesting to experiment with different filters and settings as well. There are a lot of combinations that work well. For instance here’s one more: Duplicate Group 1 (right click on it > Duplicate Group) and select the layer mask for the Layer 1 in the newly created group (you might want to hide or move the first group so they don’t overlap).
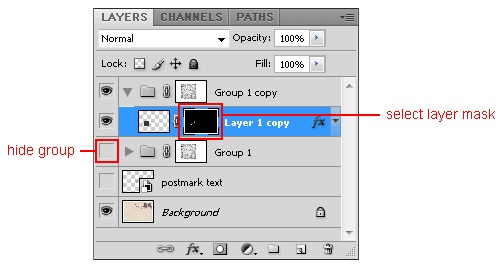
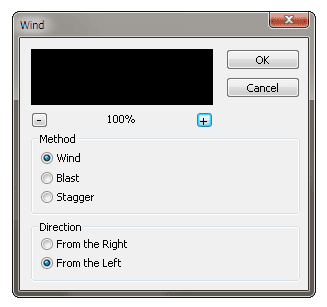
Go to top menu Filter > Stylize > Wind and in the options window put Method: Wind and Direction: From the left.
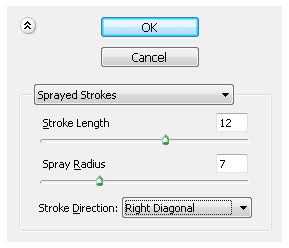
Then go to top menu Filter > Brush Strokes > Sprayed Strokes and in the options window put Length: 12 and Radius: 7.
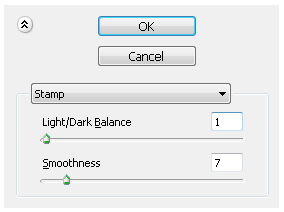
And as a final step go to top menu Filter > Sketch > Stamp. In the options window put Light/Dark Balance: 1 and Smoothness: 7.
And now you should have a heavier ink splattered postmark:
Wavy Stamp Cancel Lines Taking this a bit further, here’s how to make the wavy cancellation lines. Grab the Line Tool and in the options bar above make sure you have Shape Layers selected and put Weight: 14px.
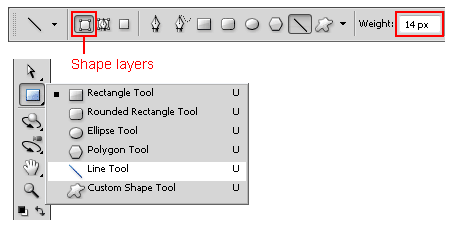
Hold Shift and drag a horizontal line. Now either multiply the line layers and move them with the Move Tool (V) or draw about 7 lines like in the image below

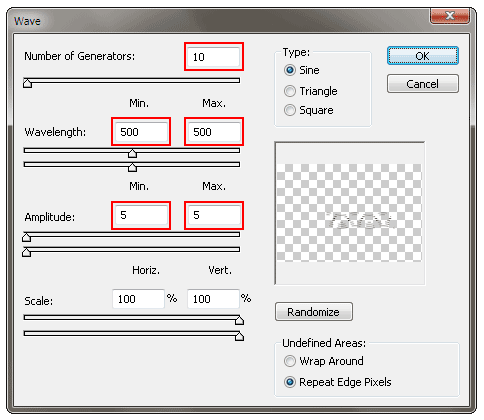
In the Layers Window select the 7 line layers and right click > Merge Layers. Go to top menu Filter > Distort > Wave. In the options window put the same as in the image below: Number of Generators: 10, Wavelegth Min/Max: 500, Amplitude Min/Max: 5. NOTE: Entering a Min value larger than Max will give you an error so enter the Max values first.
The lines will not align so get the Rectangular Marquee Tool to drag a selection around the ends and hit the Delete on the keyboard.
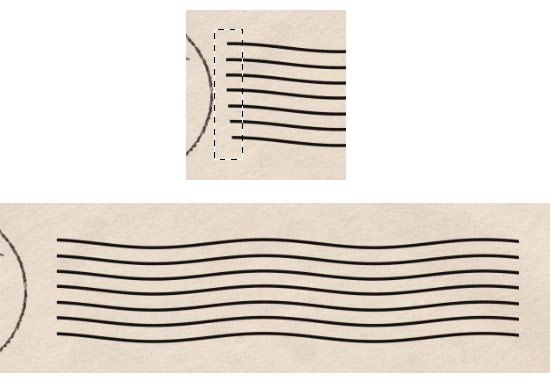
To make the wavy lines look the same as the postmark go to Step 3 above and follow the same procedure.

This is awesome! Thanks for sharing! Hope to see more PS tuts in the future ;-)
you are AMAZING. seriously — this is just what i’ve been looking for!!!
Ohhhhh!! Thanks for sharing this wonderful tutorial!!
I really love old postcards. I´ll use this for my own wedding. Thanks! :)
This tutorial is GREAT! Thanks for posting this! I hope you will be sharing more tutorials in the future! I’ve been playing around with Photoshop for awhile now, and just in this one tutorial I learned a TON of new things!!
I am totally enlightened now. Thank you for this.
I had no idea this kind of thing was possible! Thank you so much for taking the time to make this tutorial and sharing…I learned a lot from it :)
Thanks so much for the tutorial — I learned so much. I used it to create a postmark for a challenge, yeah! It’s here if you’d like to see:
http://wp.me/poWo2-1OS
Thanks again for all that you do!
BRILLIANT tutorial – thank you sooooooo much!! Even though I’d been using PShop since 1991, I have always created text on a curved path in Illustrator, create outlines, copy and paste back into PS – what a pain that was… Thank you again and again for your tutorials :D
Super tutorial!!!! Thank you so much – there is so much to learn in PS. Thank you for sharing with us how to create these.
This is excellent, but I wanted to find out. Can I use this tutorial if I only wanted my text to come out like this? I don’t necessarily want the stamp, just plain text with the ruffled edges.
I’m not a computer boff so trying to figure this all out. Thanks a million!
Yes it would work for any kind of text. Type what you want and then just follow the tutorial from Step 3. If you need to work with multiple text layers make sure you select them all and right click > Convert to Smart Object before you proceed.
Also in the beginning of Step 3, where it says to open the color picker window, you should select whatever color you want your text to be.
Thanks for this nice tutorial. Rubber stamps fascinate me. Now I will try to make some for myself using what you have taught here.
Thanks – I had no idea and now I get it. Perfect. :)
This is fantastic! I’ve been wanting to do something like this but I’m not very experienced in Photoshop. Can’t wait to try your tutorial. Thanks for sharing!!
learned a lot
This is really amazing tutorial! :) I have one problem though – in step 3 when the postmark text layer is hidden and the layer 1 mask is selected, the brush strokes filter is inactive (as well as few others). Have I done something wrong? how to proceed?
If you go to top menu Image > Mode make sure you have 8bits/Channel selected and not 16 or 32. Let me know if that was the problem.
Yes, that was the problem! Thank you so much! I am very pleased with the result :)
Great! :)
Yeah… finally get the wave right. Thanks for the TUT
Excellent tutorial. Thank you for taking time to put it together.
I love this tutorial! Thank you SO much for sharing!!!
wow such a good tutorial! im currently doing it at the moment but im stuck on one bit! On part 2 i’ve been able to create both circles and bring up the horizontal type etc, then i’ve clicked on the inner circle but my writing goes straight not around the circle still, is this meant to happen or is it meant to go around the inner circle? not sure what im doing wrong please help! thank you!
Hi,
I think maybe you are using the Elliptical Marquee Tool for the text circle. You have to use the Ellipse Tool and set it as a Path (see the first images in step 2). And to type on the path click on it with the Horizontal Type Tool when the cursor changes (in step 2 there’s a screenshot of how the cursor looks when you go over the path). Hope that helps! Let me know how it worked out.
See my message below (Nov 3rd) – U think this only works wioth Photoshop CS or later . What are you using Kelsie ?
Hiya,
thanks for the reply, iv used the ellipse tool to do the inner circle and selected paths before creating the circle. As i go to click to type the cursor changes to the icon in the picture you put up so i click to type yet it still goes straight! Is it something to do with my settings? It’s really confusing me!
Hmmm, don’t know why that happens. I’ll email you so you can send me a screenshot of how it looks.
Love it.
After struggling with this for half-an-hour and getting almost nowhere , it appears this (text following a path) only works with Photoshop CS or later . I’m on PS7 but will now load CS2 and see how we go ! Great tutorial tho’ – keep up teh good work !
Sorry, yes text on a path is a feature introduced in Photoshop CS – so if you have CS2 then you should have no problems. A workaround for PS 7 would be to use Warp Text > Arc (not as ideal as text on a path though) or you could also do the circular text in a different program and then import it in PS 7.
I’ll have to try this. I have PS 7 also.
I wanted to create a text effect which is *unique* and *familiar*. I’ve found it here! Thanks for sharing.
This tutorial is so cool! I would love to do a Paris Postmark in PSE.
Thanks for sharing.
I have made this stamp. Wonderful tutorial. Now I would like to change the text from a this stamp to create a new one. I double click on the smart object and changed the text. Then I saved it. But it didn’t change to a new stamp? Help!
Yes, that changes only the smart object text and not the final stamp. To make a new one, you would have to redo everything from step 3 on.
Thank you very much. I’m gonna try it. Have a nice weekend.
Thanks so much for showing me how….
Thank you, I’m new to Photoshop, your tutorial is great!!
The client said that they wanted the art to look like a stamp. I tried every filter I had and could not even get close. Finally I did a quick google search and voila, the PERFECT tutorial!! I had already created the postmark artwork in Illustrator, so I skipped to the effects section. I cringed when I read that I would need a special brush, but it was provided and worked beautifully. I cannot thank you enough for a simple, yet perfect, tutorial!!
This was super helpful and straightforward. Thanks!
wonderful blog, thanks to share ………
Thank you AGAIN!!!!! Adobe should hire you!!!!
Excellently written, easy to follow. Thank you!
Thanks a lot!! Easy to follow :)
this is a great tutorial.
can’t help thinking how on earth you can figure it out how to do it in the first place.
neeway, thanks, really a big help :)
Wow! Thank you for sharing so freely of your expertise and ideas.
returning to photoshop after a long hiatus. really fun to go through this tutorial! thank you!!
Once you create the stamp is there a way to just use it on another project? I can’t seem to save just the circle object?
You could save the smart object at the end of step 2 and use it as a starting point in another project, but you would still have to redo everything from step 3.
Thank you for generously sharing your talent. I am an old nana who wants to try this and I have cs5.1….I also can’t get stroke to appear and have changed to 8 bit but didn’t seem to affect it. Thanks anyway I will keep trying
Hi Tandy,
I’m not sure why that is happening – you mean the stroke for the circle selection in step 1? Do you get the Stroke Options window popup? Or the Edit > Stroke option is not available?
This is awesome. i can’t wait to try it. Your instructions are so clear and precise, LOVE IT!
Thanks so much, just what I was looking for!
Thank you, this tuts help me a lot
Superb! Thank you!
Many thanks for this tutorial, it’s fantastic and produces a fabulous result.
,Thanks for that it was really clearly written and simple to follow for a beginner.
Thanks for sharing, very clear even for a beginner like me!